CER VERA PAERIA

Great Backyard and Home Ideas

Great Summer Fire Pit Ideas

Fire pit ideas for the summer? Summer is coming, and what better way to enjoy the outdoors then in front of a bar-b-que pit while having a cold beverage in hand, relaxing at home with family and friends. In fact, you can make a smoke pit within a few hours with some help. Having a smoker to have a fire during this time of year will be easy to do. With all the styles of these fire pit designs, the ground smokers and what is available online, there has to be one ideal one for you and your family. For instance, the most popular ones are those that are dug into the ground. Also, smoke pits made of concrete rings or one made from a tractor tire rim, and even more, one with a brick wall behind it. With various looks and shapes, the best one suitable would be the one that fits your lifestyle.

1. Large Square Cement Paver and Block Fire Pit

large-square-cement-paver-and-block-fire-pit

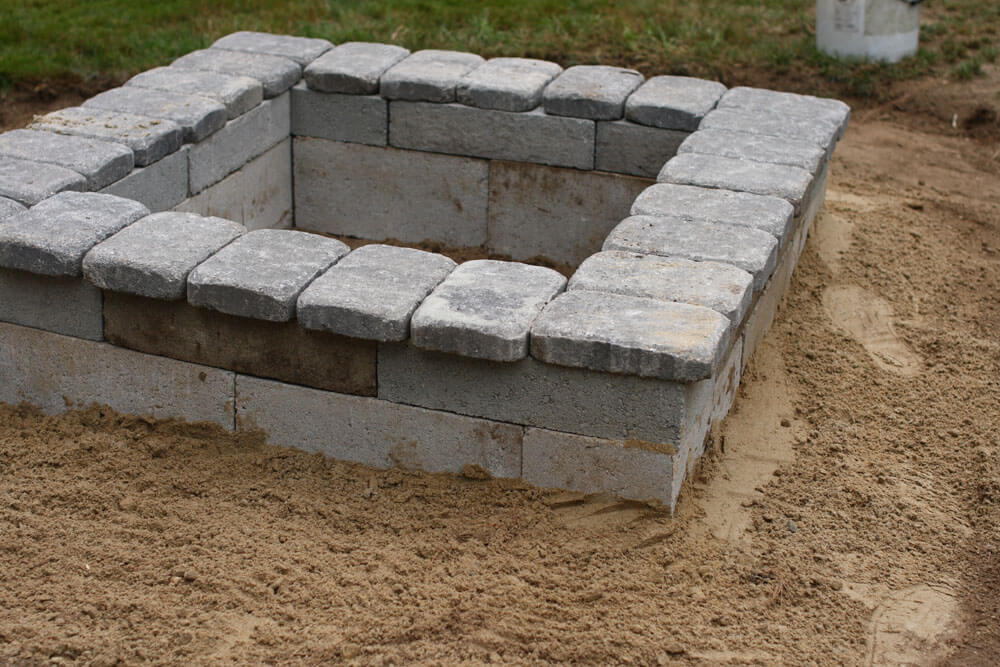
The large square one will only take two hours for completion. You will need cement blocks, rectangular pavers, and crushed stone. Pick the spot you plan on building the pit. Mark the area so as to begin to shovel out the grass and dirt so as to begin laying the pavers/blocks into a square. Once the cement blocks are formed into a square with the full / half size pavers, continue onto another layer. Then layout another layer over the first level, and one more after that by stacking them. (See photo.) For visual appeal, this is how you add depth. Put in the crushed stone in the middle. Make your fire as you normally would, with charcoal, mesquite wood, or any other type of wooden logs. Large square cement paver and block fire pit.

2. Tractor Brick Fire Pit

tractor-brick-fire-pit

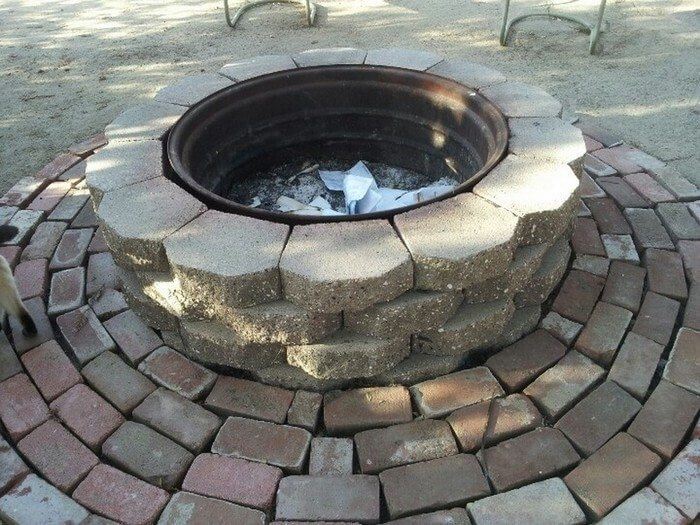
Some of the best smokers do not cost much. In fact, you can do it for less than $50. This one is a tractor wheel rim in the center as the area where the fire is in. This only took a couple of hours to build. You’ll need a tractor wheel’s rim, pebbles, and large brick rocks as the encircling material around the rim of the tire with the rock or gravel around it. According to how the circumference measurement is, the bricks will be used for the outside of the rim. As the photo illustrates, putting the rocks inside the rim are the bricks.

3. The Concrete Tree Ringed Fire Pit

the-concrete-tree-ringed-fire-pit

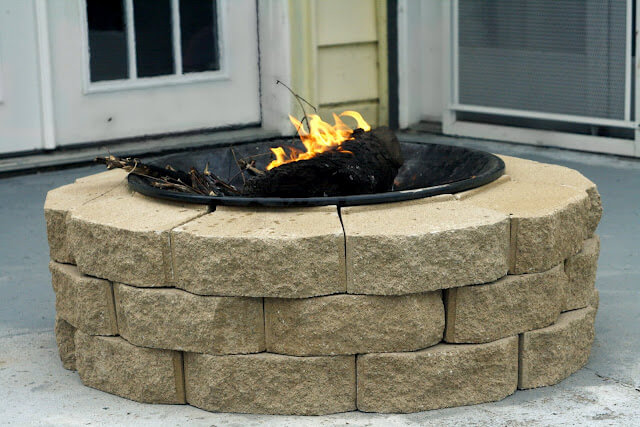
This is a small compact smoker with three concrete tree rings then within those three are two encircled with pebbles and naturally being enveloped into a circle. The fire gets lit in the middle as shown in the image. To develop this type of smoker will only take an hour.

4. Stone Pit with Half Wall

stone-pit-with-half-wall

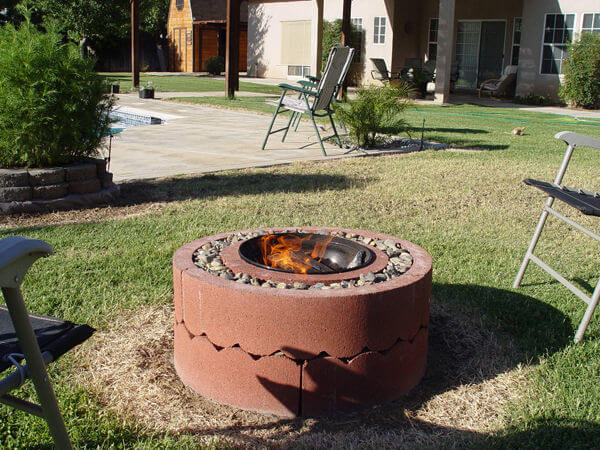
The stone fire pit with half wall is the ideal smoker for those who want to have their custom made smoke pit against the wall of their garage or side of the home. It’s a perfect spot to do this and is safe enough because it will have a half moon shaped brick wall built around the encircled pit area. Like in the photo, you can plant shrubs or floral on the side of it for presentation or looks. Although, you want to plant floral that are especially meant to be around heat, dry or tropical climates.

Finally, once you decide which one you will build, ask some of your friends or relative to enjoy the custom made smoker while you entertain them with a BBQ and some cold beverages as you enjoy building it together. Eventually, you all will be sharing stories, food, and drinks during the summer while relaxing in front of the pit. One of the best things to do is watching the fire, the soothing sounds of the crackling fire under a starlit sky. This is what it’s all about. Mesmerizing during the summertime. It’s compared to going camping, but with all the comforts of your home.

Check out more fantastic designs on the following resources!

50 Outdoor Fire Pit Ideas that Will Transform Your Backyard @ Homebnc
BigDIYIdeas

DIY Christmas Tree Decorations to Make this Season

The tradition of using Christmas tree decorations in homes started as a Pagan tradition, symbolizing life in the cold and dark winter nights as these trees could grow amidst ice and snow. While these trees were first used as a symbol of Christmas in biblical plays, it was when the plays were banned in the 16th century, that people started using them to decorate their homes. Candles and ornaments were first used to decorate the trees. Today people use Christmas lights and buy Christmas ornaments to decorate their trees. Why not you use something different with these DIY Christmas tree decorations!

1. Beautiful Ribbon Bead

beautiful-ribbon-bead-diy-christmas-tree-decoration

These DIY Christmas tree decoration are cute and easy to make. All you need are 8-15 large beads, 30-40 cm of your chosen colored ribbon (at least 1.5cm wide), and a needle and thread. Now thread a needle and use a large bead as the base, securing it by threading the cotton through it a few times and completing with a knot.

Start with about 6cm of ribbon, fold, and push the needle through its center, add a bead and fold the ribbon back over the bead, a little inside from the first layer. Thread the needle through its center and repeat till you get a Christmas tree shape and finish off by securing a bead at the top with a knot.

2. Easy-to-Make Fabric DIY Christmas Tree Decoration

easy-to-make-fabric-diy-christmas-tree-decoration

This is a really easy Christmas ornament your kids can make to harbor in the festive mood of the season. You need things like a Christmas tree ball ornament, some rubber bands, jute twine, some ribbon and a 13” square of any type of thin fabric, preferably something linen.

Cover the ball ornament with the square piece of fabric and use a rubber band to tide the top fabric. Then using the jute twine, make a knot to hide the rubber band and make a bow with the décor ribbon. Finish off by making a hanging thread for the ball with jute twine and hang it on your tree!

3. Attractive Cinnamon Stick

attractive-cinnamon-stick

Bored of the usual ornaments? Why not these DIY Christmas tree decorations? All you need are 3” cinnamon sticks, Canadian Pine garland, glue gun, assorted buttons, a glue gun, wire cutters and twine or hemp cord.

Cut a 7” piece of twine and cut a few pieces of Canadian pine garland using wire cutters. Glue the pine pieces to the cinnamon stick with the shortest piece at the top followed by the bigger pieces. Then glue the twine to the back of the cinnamon stick after knotting it at the bottom, glue on your colorful buttons and decorate your tree!

4. Mini Plaster DIY Christmas Tree Decoration

mini-plaster-diy-christmas-tree-decoration

Beautify your Christmas tree with these easy-to-make mini plaster trees. You need some plaster of Paris, a Christmas tree silicone mould, an acrylic paint, paintbrush and gold gliding flakes. First quickly mix the plaster with water as plaster of Paris sets quickly and pour into the mold.

Scrape away extra plaster and leave to dry, preferably for 4 hours. Remove from the mould as they easily pop out and paint the trees with green paint. You need to do a few coats as the plaster absorbs the paint. Then apply some gilding adhesive and flakes to the base of each tree and your DIY Christmas ornament is ready!

Need more ideas for your Christmas tree? Check out these great decorations!

Lovely DIY Christmas Decors to Try This Year
41 DIY Christmas Ornaments to Make Your Tree One-of-a-Kind
50+ Wonderful and Simple DIY Christmas Tree Decorations You’ll Love Making
50 Of the Most Inspiring Christmas Tree Designs

The Best Halloween Decors for Outdoor Space

The best way to herald the coming of this popular holiday is investing in awesome Halloween decoration ideas for outdoor space. Sadly, not everyone is able to channel their inner kid during this festive season. Nevertheless, the internet is full of thousands upon thousands of creative DIY decoration ideas that you can use to transform your outdoor space into a haunted and spooky space. Here are four great Halloween decors guaranteed to lure trick-or-treaters to your doorstep. These decoration ideas are sure to spice up your Halloween as well as create an enticing and spooky atmosphere for your backyard Halloween party.

1. Make Your Outdoor Space Cool and Scary with Glowing Ghosts

scary-glowing-ghosts

No Halloween night party would be complete without these ghostly Halloween decoration ideas for outdoor space. With a few chicken wires, gauzy cheesecloth and liquid fabric starch, you can create a ghostly atmosphere at your Halloween night party. To complete the ensemble, use battery-powered fluorescent tubes under the cheese cloth. If you love color, you can use fluorescent tubes of different colors to create a colorful yet ghostly atmosphere in your backyard. The spooky glow created by these apparitions can act as a source of light for your night party. Thus, these ghostly decorations are not only awesome, but they are also economical.

2. Use Spooky Tombstones

Spooky-Tombstones

Transform your yard into a spooky graveyard with these awesomely designed tombstones. To bring these Halloween decoration ideas for outdoor space to life you can use low-quality cardboards readily available as junk in your neighborhood. You can spread the tombstones all over your yard or position them on your front porch. Wherever you decide to place them, these graveyard inspired decorations are easy to prepare. Also, you can paint funny epitaphs on the tombstones or you can paint the names of some of your friends. If you are fortunate enough to have trees on your yard or a tree on your porch you can hang cloth dolls above the tombstones.

3. Green Glowing Eyes Behind the Bushes

green-glowing-eyes

The best Halloween decoration ideas for outdoor space are those that transport us back to our childhoods. Thus, this list would not be complete without the glowing eyes behind the bushes decoration idea that is reminiscent of Scooby-Doo and his mystery gang. Created from paper towel rolls and plastic glow sticks, these decorations are sure to give trick-or-treaters the hibby jibbies. These glowing eyes can be tucked in the bushes if you have bushes on your front porch or backyard. Alternatively, you can tuck them in the bushes on your walkway.

4. Add Extra Light to Your Backyard with Picture Lanterns

picture-lanters-for-backyard

Illuminate your walkway with these creepy picture lanterns. The amazing thing about these DIY Halloween decoration ideas for outdoor space is that you can customize them to fit your tastes and preferences. Also, you can print your own spooky pictures and install them in a frame. Then nail the frames together to create a square shape and insert a candle inside. The end product is a creepy yet awesome way of illuminating your front porch at night. Similar to all other decorations listed here is that you can make these lanterns from readily available materials. The main materials you will require are vellum paper, candles and cardboard frames.

Don’t have enough ideas yet? Here are some great resources you should definitely check out:

64 Best DIY Halloween Outdoor Decorations
50 Astounding But Easy DIY Outdoor Halloween Decoration Ideas

Five Inexpensive and Simple DiY Ideas to Transform your Backyard

Do you have a threadbare backyard that would do with a major transformation? Are you discouraged that it would cost a small fortune to do a makeover project that will do justice to your sense of style? Take heart then because it is actually possible to transform your backyard into a place of elegance, beauty and natural charm by using a number of odds and ends in the home. As the following five simple DiY ideas show, you do not have to be a landscaping expert to turn your backyard to an object of envy for all your friends and neighbors.

1. Keep Pets From your Plants using Pine Cones

pine cones backyard

If you own a litter of playful kittens or pups, you will soon be driven to distraction by the amount of damage they can wreak your pristine backyard. Preempt this by collecting pine cones and spreading them at the base of the more vulnerable backyard plants. They will look natural and ingenious and their prickliness will keep the pesky pets away. Moreover, the pine cones will reduce the need to keep watering the plants especially in the hot summer months.

2. Hanging Jar Lanterns

Hanging Jar Lanterns

There is nothing quite like the glowing light of a series of lanterns to bring a measure of staid elegance and even magical allure to a backyard garden. The good thing is that you do not have to spend a fortune investing in exotic hanging jar lanterns. With a bit of improvisation, you can turn all those empty glass jars in your kitchen into more than passable hanging jar lanterns and bring magic to all those evenings spent under the stars. The actual project is such fun and safe enough to involve your children so they can spend all that bountiful energy doing at least something useful for once.

3. Use Exterior Mirrors to Create Illusion of Space in your Small Backyard

If your tiny backyard has been the butt of sinister jokes from your neighbors and friends, you can easily turn the tables on them by using mirrors. Place your mirrors strategically around the garden especially along corners to give the best illusion of space. It is important to pick the location of the mirrors with care as you do not want to create a nuisance by reflecting sunlight onto your neighbor’s place or out on the streets.
DIY illusion mirrors

4. Make a Giant Decorative Xylophone

Make-A-Giant-Decorative-Xylophone

Have you been wondering what to do with those leftover pieces of wood from your recent home makeover project? Do not throw them away just yet. You could use them to transform your backyard to a very entertaining place. Grab a handsaw and cut them down to different sizes, each one progressively shorter than the last. Paint them over using a set of vibrant colors and you are all set to make a very functional xylophone for your backyard. String the pieces of timber using a set of tough ropes and you are all set to enjoy making melodies!

5. Use Cider Blocks to Make an Impromptu Backyard Bench

cider-blocks-diy

Ever wondered what to do with all those cider blocks you have accumulated in your attic over the years? From their regular shape, strength and capacity to withstand the corroding effect of the elements, cider blocks make for great materials to use for a host of DiY projects in and around the home. One of the most ingenious of these is exploiting their strength to build an impromptu albeit strong and comfortable enough backyard bench. You will need a series of four sturdy pieces of wood, some matting material and couches to make the bench. The concept is so simple that you do not need a manual to get it right.

For more DIY backyard ideas visit this post : 40+ Outstanding DIY Backyard Ideas That Will Make Your Neighbors Jealous – cutediyprojects

© 2024 CER VERA PAERIA

Theme by Anders NorenUp ↑